You may want to resize your partition to solve an issue with Win32 Disk Imager not being able to write to a new card due to it being slightly too small, or to change to a smaller SD card.
Here’s what we want to do:
Resize the linux partition on the SD card to fit within the new space requirement, leaving an unused area after it
Resize the file system on that partition once its been changed.
Resize the .img file
Resize The Partition
First you need to reduce the size of the linux partition. DO THIS FOLLOWING THE GUIDE HERE (if your issue is with Win32 Disk Imager then you may have to find a SD card the existing .iso can be written onto to do this, even if this means needing to use the next card capacity up from the size you want to use.
Once the resize is complete you need to find out the total final size of the used space on the card (the FAT16 boot partition the RPi needs and the ext 4 partition that holds Linux, basically all the partitions before the unused area at the end of the card you’ve just created.
Now with the SD card booted up use the following commands to find the size of the area thats used:
sudo fdisk /dev/mmcblk0
Press ‘p’ then return to see the partitions.
For example you will get something like this:
Device         Boot  Start      End  Sectors  Size Id Type

/dev/mmcblk0p1        8192   122879   114688   56M  c W95 FAT32 (LBA)

/dev/mmcblk0p2      122880 12410879 12288000  5.9G 83 Linux
Get the End sector value for the last partition (12410879). Multiple by 512 (bytes per sector) to give you the target .iso file size (6,354,370,048 bytes) and make a note of this value (make sure you haven’t made a mistake!)
Press ‘q’ then return to quit.
In this example we’ll say we want our new card image to be 15400000 sectors (x 512 bytes per sector = 7,884,800,000 bytes)
Create a new .iso with the resized partition
Now shutdown the RPi and use Win32 Disk Imager. to read an .iso file from the SD card (we’ll reduce its size after)
Alter the .iso file size for the final SD card
Download our IBEX File Size Changer app from here
Using this app open your .img file:
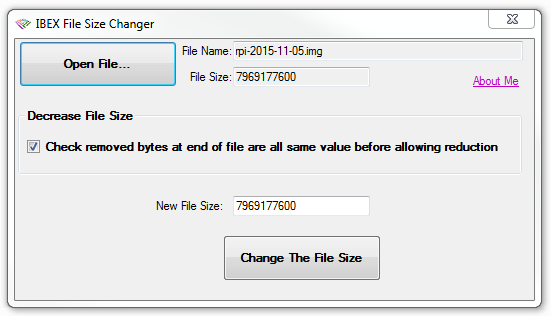
The .img file is simply a byte mirror copy of the SD card.
You can uncheck the checkbox as we don’t care what the values of the bytes to be removed are in the unused space at the end of the card. Enter the new file size in bytes you calculated above and press ‘Change The File Size’.
That’s it, write the image to the smaller SD card and it should work fine.
4 years ago
Finaly found a way to create backup with the size smaller than SD card.
Before first boot I deleted line that expands partitions to max size, latter manually expanded it to size that I wanted. But with this program I can reduce backup size after using my RPI for a long time.
Works 100%
5 years ago
You need to use gparted utility on the RPi first to reduce the Linux partition by more than you plan to shrink the image by.
That way the piece at the end, that you are about to remove with IBEX File Size Changer will be after the end of the partition and will not affect booting again.
I use a USB adapter with sd card in, plugged into a USB port, run “gparted” to reduce the partition by say 100MB.
Then remove the sd card (in USB adapter) , put in the PC, Run IBEX, uncheck the “Checked removed bytes..” option.
Calculate the new size to be 100MB less the the initial size and apply.
5 years ago
Not working for me. The resized image is corrupted.
5 years ago
i have the same problem “End of file bytes are not the same at byte”
5 years ago
Trying to reduce a 64GB image to less than 32G, but what ever new size I enter results in the message: End of file bytes are not the same at byte 30337400832.
5 years ago
Thanks for this. The instructions and program really helped. There are 2 things that caused me some confusion.
Create a new .iso with the resized partition. .iso should be .img
Alter the .iso file size for the final SD card .iso should be .img
It might save someone from trying to make an .iso file from the sd card.
Warm Regards
Kevin
9 years ago
So why did we need to “take note” of the “end sector value”?
8 years ago
to calculate the new file size
5 years ago
but i didnt see you use it!!??
9 years ago
Thank you for your post. The procedure worked fine for me.